Let me walk you through the basics of launching your website. For starters, you may require the assistance of a web developer to build your page. If you are seeking for a professional look you might need to hire a designer. Then you'll need a web server to host your database and upload your files. Lastly, you'll need a domain name to associate your website to your company's name.
Yeah, I know what you're thinking right now. That would take a significant amount of time and money. But what if you just want to make a simple website where your users may look around your products or your store's menu, along with a simple contact form to handle inquiries and orders? With technological advancements, there are now new options to get your site online without paying anything. This post will walk you through the fundamentals of uploading a simple site for free.
Step 1: Designing your landing page
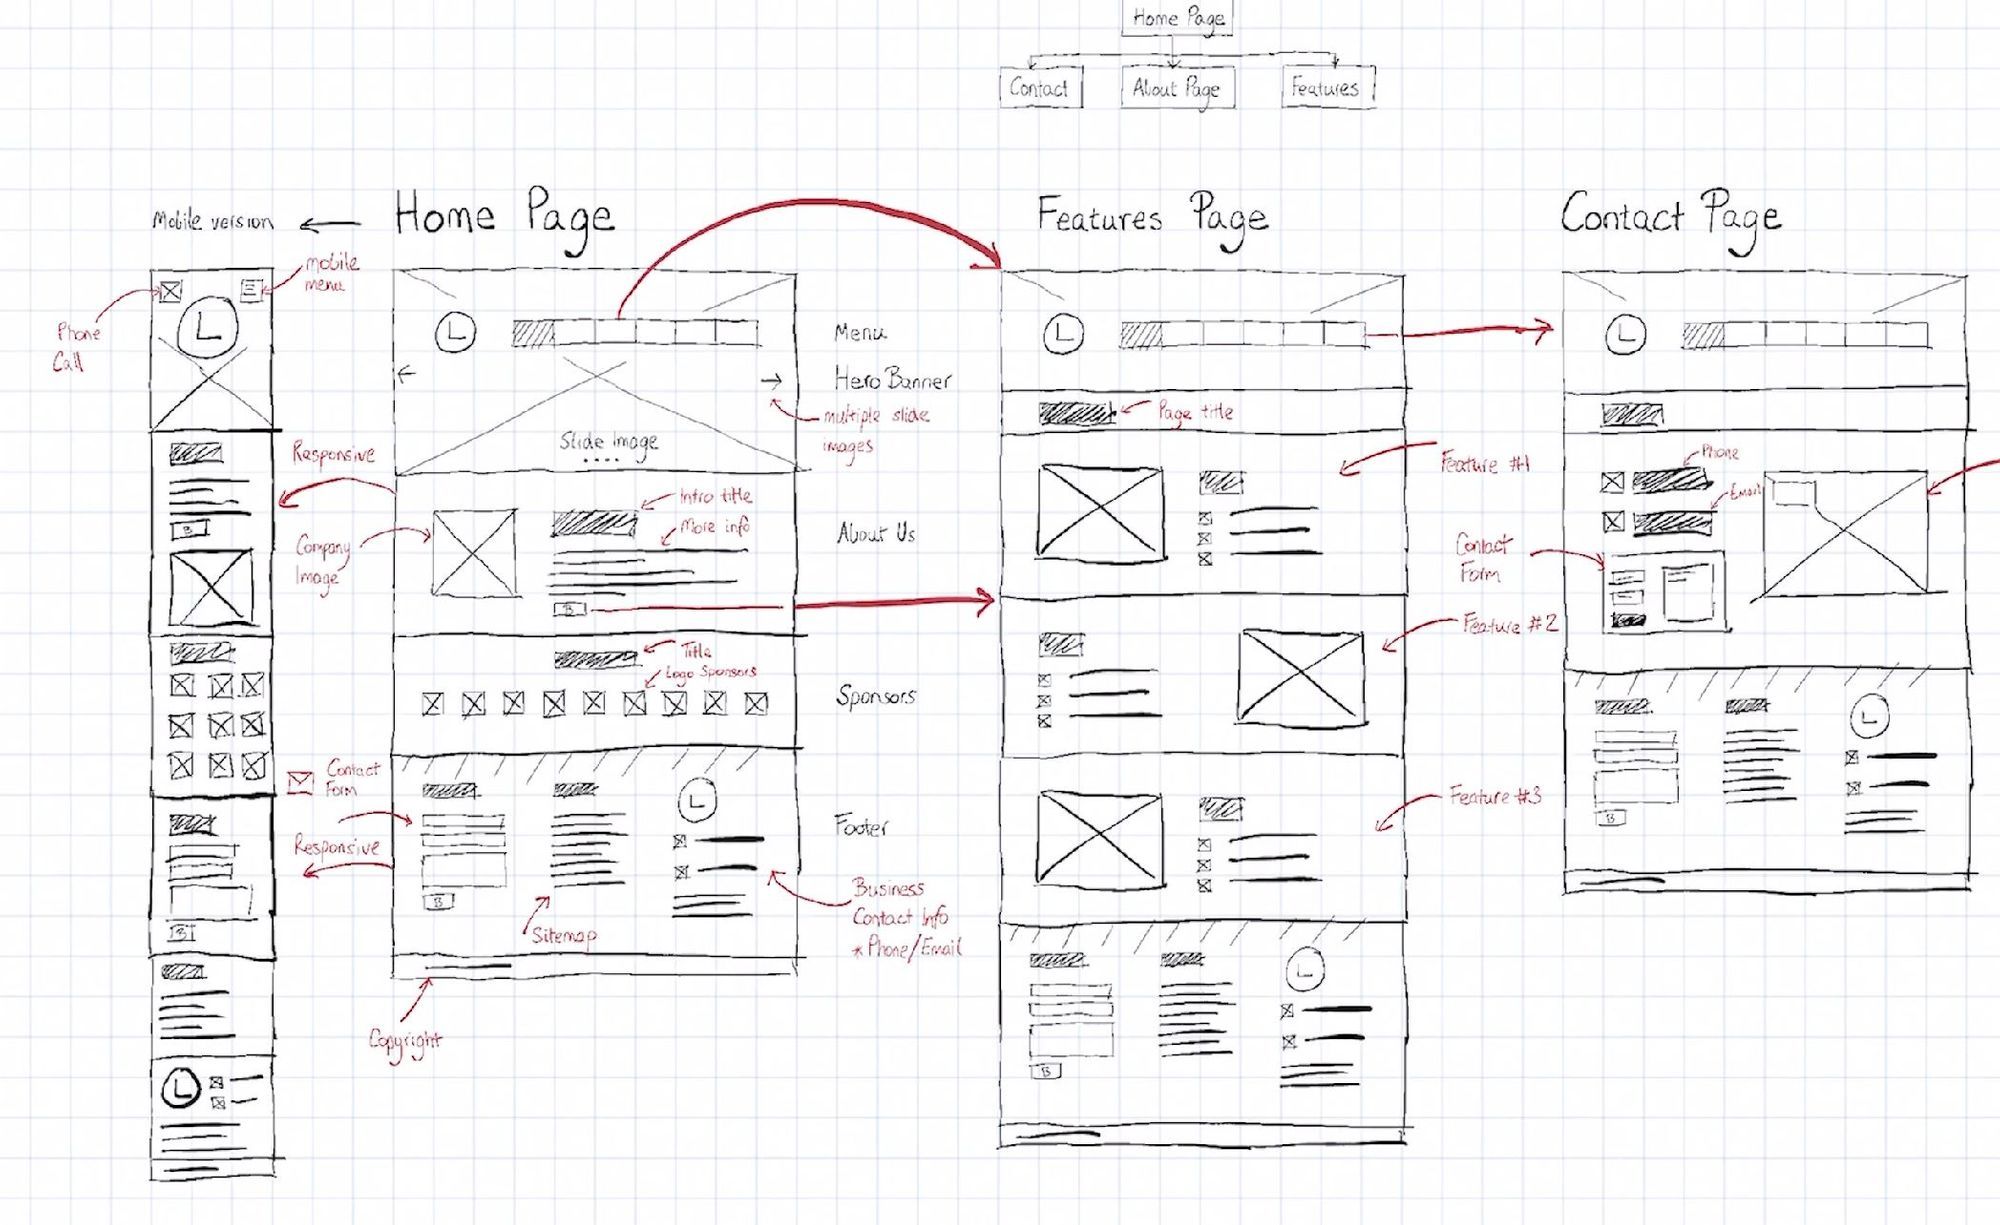
We must first prepare and layout your page. Every time I start a new project, I make sure to design it first. It's tempting to begin developing stuff right away, but if there's one thing I've learned from designing websites, it is that you must start with a concept. You are not required to begin big and detailed. Grab a pen and paper then start doodling basic shapes and placeholder text to get a rough idea about what you truly wanted to appear on your website. I don't want to bore you with the fundamentals of wireframing and designing from scratch, but if you want to dig deeper, check out this article.
If you're not a tech whiz and just want a basic website, you might find that step challenging. Let's attempt to tone it down a notch. Finding a page builder is one of the the simplest ways to develop a site. There's a lot out there, but for starters you should try something free. Fortunately I came across this app, https://teleporthq.io .

They have premium features but i'll discuss here the basics so you can go and signup for their free tier. Once you're in, you'll see this page where you can create a new project.

Next, they will offer you a bunch of free templates to start with. You can start with a blank project but for this article I selected "Landify".

Then you will be redirected to their awesome site builder. If you're an experienced designer you might find their interface similar to Webflow. You will see some menu on the left for Elements, Layers, CSS, and Assets.


I'll let you play around their app for now, but just want to remind you that the goal is to follow what you've created on the very first step, your wireframes.
Total Expenses so far: Zero.
Step 2: Prepare the codes
Once you're good and ready, let's try exporting the codes. If you look at the upper right you'll see a download icon that says Export Project. Click that button then select HTML. Finally, click Export Code as Zip.
Note: This feature is experimental as of this writing, so some elements might not export correctly as expected. Let's look forward for upgrades in their app soon.

After export you'll have a zip file that should contain files like this:
 Now let's proceed to the next step and see what do we need these for.
Total Expenses so far: Still Zero.
Step 3: Deploying your site
Finally, let's prepare that folder and upload it in a server. Usually web servers cost a lot of money as this will host your files and serve them to the web so your visitors can see them. You can imagine a server as a data storage for your files. After years of experience, I've found a new way of uploading these files on the web for FREE. This involves generating static websites in a JAMStack architecture ( short term for Javascript, API, Markup) which I might discuss on a separate article soon.
Now let's talk about that free server called Netlify. It is a web hosting and automation platform that accelerates development productivity. Why it costs less? It is solely based on its Serverless Architecture. With your static files (HTML, JS, CSS files) , Netlify uploads this on a CDN (Content Delivery Network) and let's visitors do the computing with their own devices’ CPU and RAM. That’s why you can only host static website there. Since your website is already a rendered HTML there's no runtime. This means it doesn't need to process your request, do security checks, pull information from the database and compile your page. Security is also not a big concern since there's no way for anyone to inject something in your code because it's already a static file HTML. Sounds cool right?
Hope you got the gist of it, so let's proceed creating an account. You can do this by visiting https://app.netlify.com/signup.

Once you're in, you should be able to see the dashboard. Look for the Add new site button, and select Deploy Manually.

You will be redirected to this drag and drop page below. Simply click the icon and browse for the folder that we downloaded earlier or drag it inside this page. If all goes well, it will immediately start uploading.

After that, Netlify will start building your folder and deploy it to their CDN. You will be able to see this Site Overview page with a step wizard that tells you what to do next. Once the deploy is done, it will give you a link that looks like this: https://[some-random-name].netlify.app.

You can customize this link by visiting the Deploy Tab > Deploy Settings > General > Change site name. Update it and hit save.
Visit that new netlify link, and that's it! You have your site online. Let me know how it looks and you should see something like this: aouie-shop.netlify.app

Total Expenses so far: Absolutely Zero. Nada!
Optional: Adding your own Domain Name
The steps above should surely help you get your site up and running specially if it's just a basic website or a portfolio. You can also do this to preview your html projects and let others see it from their devices. But what if let's say you're a business owner that needs to customize the name of their website like my portfolio, ralphjohn.com.
Sadly this part is not free though, but there are cost friendly domain hosting like Namecheap. My domain cost $9.56 for 1 Year. If you ask me that's not bad for a customized domain name with my branding on it. If that sounds good for you then sign up for an account and search for your domain.

Once you have your domain, connect it on your Netlify by going to your Site Settings > Domain Management > Add Custom Domain. You can follow this article if you need more help.

Once that's done, you are good to go and share that new website to your friends!